
If you’ve worked with custom themes in WordPress, you know that you can typically add a search.php template file to your theme files, and that will produce a custom search results page.
With Strattic, there are a few extra steps you’ll need to do in order to make sure your search results page is customized to your liking.
Search templates page
Strattic Search works via a dynamically generated WordPress page in your site which injects it’s content via a tag with ID of #strattic-search-results. This uses your default WordPress page template, but if you wish to use an entirely separate template for your Strattic Search page, you can do this by creating a strattic-search.php file and putting it in your theme or child theme directory.
It could look something like this:
<?php get_header(); ?>

<main id="site-content">

	<div id="strattic-search-results"></div>

</main><!-- #site-content -->

<?php get_footer(); ?>
Depending on the style and setup of your site, your template may vary. This is taken from the twentytwenty theme as an example, where would want the <div id="strattic-search-results"></div> element just inside your main content “wrapper”. This element is what what our JavaScript looks for to start replacing with search results.
And, as far as your main PHP template file goes, that’s really all there is to it. On to the Strattic Search templates and template tags!
Templates and examples
The search results page pulls in HTML templates with JS. These templates allow for structure, CSS, and JS to interact with search results that are returned from Algolia.
To see these templates, you can go to yoursite.site.strattic.io/wp-admin/admin.php?page=strattic-templates to see the templates. There are five templates we use:
- Search main template (a single result)
- Search main template (multiple results)
- Search results template
- Search results pagination template
- Search not found template
There are descriptions for each of these templates on the template page.
While we include some default templates, you can customize the HTML structure of the templates as you like and save them.
For example, you might choose to add the thumbnail and a “Read more…” link to your individual search results. You could do this by modifying the “Search Result Template” to be something like:
<header>
    <h2><a href="{{url}}" rel="bookmark">{{title}}</a></h2>
	<img src="{{{thumbnail_url}}}" alt="{{title}}" />
</header>
<p>{{{excerpt}}}</p>
<a href="{{url}}" >Read more...</a>
Feel free to play around with the structure and content of your search results. You can also add specific HTML id and class tags to your elements as you need them to target for styling (see below).
Search Template Tags
As you can see from the above, there are “template tags” that can be used as placeholders for what you get from the Algolia search results. These tags are Mustache.js-type tags.
There are several template tags to choose from, including:
{{search_string}}{{id}}{{url}}{{title}}{{author.name}}{{{thumbnail_url}}}{{{excerpt}}}{{search_results_count}}- and more at the top of the Strattic Search Templates page
You can see what’s available to you by exploring the request that comes back from Algolia in the Networking tab of your browser.
For example, if you go to https://developers.strattic.com/search/?q=search you would see a request coming back from Algolia with several “hits”:
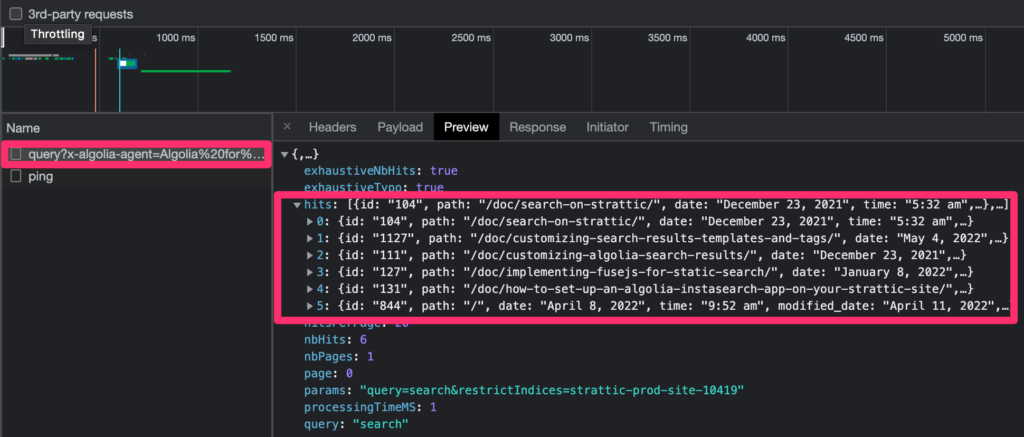
Within each “hit” JSON object, you can see the different properties and values of what is returned:
{
    "id": "111",
    "path": "/doc/customizing-algolia-search-results/",
    "date": "December 23, 2021",
    "time": "5:43 am",
    "modified_date": "April 11, 2022",
    "modified_time": "6:42 am",
    "timestamp": "1640238180",
    "title": "Customizing Algolia Search Results",
    ...
}
If you would like to add to what is returned from Algolia, see our documentation on Customizing Algolia Search Results.
Listing taxonomy terms
Taxonomy terms are often used in search results, for example when showing all of the categories a particular search result is in. To do this, you can use the {{terms_category}} tag, where “category” is the name of the taxonomy you wish to query.
In the following example, adding .length to the tag allows for a basic conditional check to avoid loading an empty <ul> tag. Then # before the tag label starts a loop and / before the tag label ends the loop. Within the loop you can access any of the sub-properties of the {{terms_category}} tag (these can be seen when directly viewing the raw Algolia request on your website).
{{#terms_category.length}}
<ul>
	{{#terms_category}}
	<li>
		<a href="{{home_url}}/category/{{slug}}/">
			{{{name}}}
		</a>
	</li>
	{{/terms_category}}
</ul>
{{/terms_category.length}}
Access a single taxonomy term
Sometimes you may wish to access only a single taxonomy term rather than looping through all of them. This can be achieved by adding dot followed by a number, followed by another dot, followed by whatever property you wish to access from it. The following example lists the first category term slug within a class name.
<article class="category-{{terms_category.0.slug}}">
	<h1>{{title}}</h1>
	<p>{{excerpt}}</p>
</article>
How to style your search results
Since your search results are formatted with HTML markup, you can add any needed custom id or class properties to the HTML elements.
Expanding on the above example:
<header>
    <h2 class="search-result-title"><a href="{{url}}" rel="bookmark">{{title}}</a></h2>
	<img class="search-result-image" src="{{{thumbnail_url}}}" alt="{{title}}" />
</header>
<p class="search-result-excerpt">{{{excerpt}}}</p>
<a href="{{url}}" >Read more...</a>
With the above added classes, you can target these elements with CSS as you normally would.
Limiting the number of posts
Sometimes you may wish to set the number of posts to display per page. You can do this by setting the value of the JS object of strattic_algolia.hitsPerPage as in the code example below.
/**
 * Only show 10 posts per search page.
 */
add_action(
	'wp_head',
	function() {
		echo '
<script>
	var strattic_algolia = [];
	strattic_algolia.hitsPerPage = 10;
</script>
';

	}
);
Filter results based on post-type
You may wish to filter the results of a search based on post-type. To do this, you need to send the post-type for each post to Algolia (set via the strattic_search_formatting filter), set an Algolia facet (used for only returning results based on a specification you set) and to change the request sent to Algolia (achieved via editing the JavaScript variable strattic_algolia.filters).
Note that this is different from excluding what is sent to Algolia as shown on the Customizing Algolia search results page, as it allows you to give the site visitor the option to chose which post-types to filter on, whereas the method mentioned on the other page simply removes all the other post-types, precluding anyone from searching them.
Here is some example code which allows you to only return results for the “post” post-type. You can adjust the JavaScript variable strattic_algolia.filters via any method you wish. A popular option for this is via filter tabs on your search page (which you would need to implement manually).
<?php

/**
 * Adds post-type specific search for Algolia.
 */
class Strattic_Search_Post_Types {

	/**
	 * Constructor.
	 */
	public function __construct() {
		add_action( 'wp_head', array( $this, 'inline_script' ) );
		add_action( 'strattic_search_formatting', array( $this, 'send_post_type_to_algolia' ) );
		add_action( 'strattic_facets', array( $this, 'algolia_facets' ) );
	}

	/**
	 * Inline script to set the Algolia filter.
	 *
	 * Can also set this in an external script or in the footer.
	 */
	public function inline_script() {
		echo "
		<script>
		let strattic_algolia     = [];
		strattic_algolia.filters = \"'post_type': 'post'\";
		</script>
		";
	}

	/*
	 * Add post-type for each post sent to Algolia.
	 *
	 * @param array $item The search item.
	 * @return array The modified search item.
	 */
	public function send_post_type_to_algolia( $item ) {
		$post_id           = $item['id'];
		$item['post_type'] = get_post_type( $post_id );

		return $item;
	}

	/**
	 * Add post-type attribute for faceting in Algolia.
	 *
	 * @param array $attributes_for_faceting Attributes for faceting.
	 * @return array
	 */
	public function algolia_facets( $attributes_for_faceting ) {
		$attributes_for_faceting[] = 'searchable(post_type)';

		return $attributes_for_faceting;
	}

}
new Strattic_Search_Post_Types;
Detecting presence of the Strattic search page
When customising your Strattic search page, you may need an equivalent of the is_search() function but for the Strattic search page. For this, you can use the is_strattic_search() function provided below. It works in the same way as the native is_search() WordPress function, but for the Strattic search page.
/**
 * Is this a Strattic search page?
 * Doesn't use Strattic_Search_Settings() because it is not always loaded yet.
 *
 * @return bool True if on a search page.
 */
function is_strattic_search() {
	$slug = strattic()->search->settings->get_option( 'search-page-slug' );

	if (
		'/' . $slug . '/' === substr( $_SERVER['REQUEST_URI'], 0, strlen( $slug ) + 2 )
		||
		'/' . $slug === substr( $_SERVER['REQUEST_URI'], 0, strlen( $slug ) + 1 )
	) {
		return true;
	}

	return false;
}
No search page present?
Sometimes you may only require specific post-types to be displayed in your search results. You can achieve this via the following code, which modifies the post-types sent to Algolia for indexing.
Body classes
Sometimes, the styling for a search page comes from CSS classes added to the body class itself. You can copy the CSS classes from the WordPress search page over to the new Strattic search page instead. This is a common problem on sites running the Elementor plugin.
/**
 * Change body clases on the search page.
 */
add_filter(
	'body_class',
	function( $classes ) {
		if ( is_strattic_search() ) {
			$classes = explode( ' ', 'search search-results elementor-template-full-width elementor-kit-5805 elementor-page-6040' );
		}

		return $classes;
	}
);
Strattic Search with Elementor or Divi
You can create a custom designed search page with Elementor or Divi by simply creating a regular WordPress page at /search/ (or wherever your Strattic Search page is set to) and including the <div id="strattic-search-results"></div> code in the page content. This will add the Strattic Search results into the page, which you can then design via the Strattic Search template editor. This method also helps to fix problems caused by these plugins preventing the dynamically generated Strattic Search page from showing up.
Template specific stylesheets
The search results pages for some sites include huge amounts of page or template specific CSS. When trying to replicate the styling of the WordPress search page into a static page, it may be necessary to copy those custom stylesheets over to your new page. Note that if the stylesheets were added via a plugin such as Elementor, then changes to that plugin in future may break the stylesheets added to your Strattic search page.
